Urlaub in Lichtenau-Husen
TomSoft - handmade Software

Aus der Software-Werkstatt

Hier finden sie Code-Beispiele und Programmier-Tricks aus unserer Software-Werkstatt. Ich hoffe auf diesem Weg etwas von dem zurückzugeben, was ich in vielen Jahren von den unzähligen Blogs, Webs und Newsgroups im Internet gelernt habe. Geben und nehmen - so sollte es sein. Kommentare und Anregungen nehme ich gern entgegen!

A Service-Monitor Gadget for IIS and SQL-Server

Samstag, 29 Januar 2011 18:16 von Tom Gröger


This Gadget for Windows Vista or Windows 7 gives your control over Windows Services like IIS/W3SVC or MSSQLServer. You can see if the Services are running, stop or restart them.

One strange thing that always hits me when I am fighting deadlines is that the closer they come the more I let myself drift away to spend time on some other non-important projects. I am sure that every programmer knows about it ..
Every now and then I give up to they call and instead of getting important things done I spend some time on something that I always wanted to do. This little gadget is the fruit of one of those fits of procrastination:

ServiceMonitor

What is it good for ?


My Development machine runs under Windows Vista using a full blown IIS7 and SQL-Server. While I use both for my daily work I don’t want to have them running always. so I changed the configuration for the W3SVC and MSSQLServer Services from automatic to manual start and wrote me a batch file that starts the Services on the first run and stops them on the second run. That kind of worked but it was awfully slow and often I forgot if the Services where already running and stopped them instead of starting them.

Ok, one of those busy days I had enough of this crutch and thought it would be nice to have a little gadget that shows me the current state of my IIS and SQL-Server and allows me to start or stop the Services.
What sounded so easy finally took me more than 2 days to realize - but it was worth it and beside that, it was a lot of fun.


How it works.


Gadget programming is actually quite easy and straight forward, but has some peculiarities. one of my first step was to download a Visual Studio Gadget Template which gave me a basic overview about the structure of a gadget. A few researches on the Net revealed that some WMI Scripting and a little HTML should do the trick .. well yeah, sort of. The first problem was to find the gadget folder so that I could work on the gadget.html file itself instead of re-installing the gadget every time.  Here it is:

C:\Users\YOUR_USERNAME\AppData\Local\Microsoft\Windows Sidebar\Gadgets


The second problem was more technical: Using WMI it is very easy to connect to a WMI Server and get access to the Services, but the html display is not updated immediately when you write to it. My first attempt was to request the current state of all registered Services in a loop and write the output into a table cell until the Serive is either running or stopped. Unfortunatly the IE Page did not reflect any changes, all I got was the first state ( while entering the loop ) and the exit state. Rats!

Now in a regular Windows Script you can simply use WScript.Sleep() to release a time slot and give the Browser page some time to refresh the display, but Windows gadgets run as HTML Applications (hta) and WScript.Sleep or WScript.Echo are properties of the WScript object, which can’t be created. Instead, the WScript object is automatically created - and only created - when you run a Windows Script Host (that is, WScript.exe or CScript.exe), not if you start a hta gadget.
Luckily there is a workaround for this problem using window.setTimeout to mimik WScript.Sleep, so instead of running in a closed loop we merely use setTimeout and recursive calls, and that lets Windows properly update our little Gadget display.


Installing the Gadget


The last hurdle to take was to create some kind of installation package – I thought.

In fact Microsoft was very very smart here, all you need to do is to pack all files of a gadget into a ZIP file and then rename the .zip extension to .gadget ! To install the gadget on your machine, simply double-click on the gadget archive and it installs itself in your gadget folder. Now that was easy, wasn't it ?

To use it, simply click on the Start and Stop buttons to start and stop the Services, and click on the header to refresh the Display - I did not want to have a timer running that constantly request the Service State.
You can add or remove Services on your own demand, take a look into gadget.html, all Services are declared inside the .Init() method.

Hope some of you will find this useful, enjoy, and let me know when you extend it !


Resources:


Embedding CSS and JavaScript in User Controls

Donnerstag, 14 Januar 2010 13:45 von Tom Gröger


User controls are among the better features that ASP.NET has to offer. I use them either whenever I realize that I can use a piece of code and markup somewhere else, but more frequently I write a User Control when things on a webpage are getting crowded and complicated and I want to split my code into smaller pieces.

Very often these "black box" User controls not only contain Html markup and Server code, but also JavaScript and CSS blocks. It is there when a seemingly simple task can get awfully complex - do you want your JavaScript in the Header or (better) in the bottom of the Page ? do you need <%= %> expressions to embed values like ClientID's into the script ? The same applies to CSS Style blocks, they should be placed in the Html Header in order to accelerate Page rendering. And sometimes you may also need expressions to embed WebResource-Urls or other values into the Styles Sheet.

Well, lots of articles have already been written to address this problems, none of them could truly convince me, until I came up with my own simple solution. Here is a short example:


<asp:Literal ID="DebugInfo" runat="server" Visible="false">
<link href="~/default.css" rel="stylesheet" type="text/css" />
<script src="C:\Eigene Dateien\Visual Studio 2008\scripts\jquery-debug.js"
type="text/javascript"></script>
</asp:Literal> <script runat="server"> protected override void OnPreRender(EventArgs e) { base.OnPreRender(e); // load ScriptBlock and replace ClientID's string src = ScriptBlock.Text.Replace( "LABEL_CLIENTID",
this.myLabel.ClientID); // move it to the bottom of our page this.Page.ClientScript.RegisterStartupScript( this.GetType(),
"MyScript", src ); // load CSS and move it into the Header src = Environment.NewLine + CSSBlock.Text; this.Page.Header.Controls.Add( new LiteralControl(src)); } </script>
<!-- Html Markup    -->      
<div id="MyDialog" style="display:none">
   
   <asp:Label ID="myLabel" runat="server"></asp:Label>

</div>


<!-- CSS Block    -->      
<asp:Literal id="CSSBlock" visible="false" runat="server">
    
   <style type="text/css">
      #MyDialog {width:750px; height:365px; }
   </style>
   
</asp:Literal>


<!-- Script Block    -->      
<asp:Literal id="ScriptBlock" visible="false" runat="server">

    <script type="text/javascript">
    
       $(document).ready(function() {
           var objLabel = $("#LABEL_CLIENTID");
           objLabel.html( "My User Control");
       });
    
    </script>
            
</asp:Literal>


The first thing that you have to do is to hide the CSS and Script Blocks in Server-Side Literal-Controls with a Visible=False attribute. This way our code is visible to ASP, but is not rendered into the Page:

<asp:Literal ID="DebugInfo" runat="server" Visible="false">
<link href="~/default.css" rel="stylesheet" type="text/css" />
<script src="C:\Eigene Dateien\Visual Studio 2008\scripts\jquery-debug.js"
type="text/javascript"></script>
</asp:Literal>

What happens here is that the ASP Parser finds two References: The first Link-Type points to my CSS File and so resolves all css class-definitions to avoid the dreaded Visual Studio “The class or CssClass value is not defined” warning. Because the Literal Block is invisible to the Page, the Stylesheet itself is not loaded on runtime. You can achieve the same result in one line if you do not need Javascript Intellisense:
 
<link href="~/default.css" rel="stylesheet" type="text/css" 
runat="server" visible="false" />

The second Script Type points to my jQuery VsDoc File. Since this Script is only used as a Reference for the ASP Intellisense Parser we can safely use a local path to the file. Voila – jQuery Intellisense in our User Control. 

Now lets take a look at the Javascript Block:
<asp:Literal id="ScriptBlock" visible="false" runat="server">
   <script type="text/javascript">

     $(document).ready(function() {
     var objLabel = $("#LABEL_CLIENTID");
     objLabel.html( "My User Control");
     });
   </script>
</asp:Literal>


The Javascript code is completely embedded into our ASP Server-Side LiteralControl. No need to mess around with encoding the </script> tag, just write and format your JavaScript Code as if you would do in a static html file. Note the LABEL_CLIENTID token, we will use that later to replace the token with a valid ClientID. Usually this kind of solution to overcome ASP.NET containership naming scheme issues uses code blocks like this :

var ctrl = document.getElementById("<%= myLabel.ClientID %>");


Fortunately we can’t use code blocks inside a Literal Control, so we are forced to use something more elegant than this ugly hack. So how do we get the Code into the Page ? This is preferably done in the Pages OnPreRender Event, which is launched as one of the last events during the creation of a page:

// load ScriptBlock and replace ClientID's 
string src = ScriptBlock.Text.Replace( "LABEL_CLIENTID", this.myLabel.ClientID);


// move it to the bottom of our page
this.Page.ClientScript.RegisterStartupScript( this.GetType(), "MyScript", src );


First we load the Content (= our Script ) of the Literal Control and replace the Token with the targeted Controls ClientID.  If you are using some kind of Script Compressor then this would be the right place to strip comments and white spaces etc. 
Next we use the pages ClientScriptManager to  insert our Script into the bottom of our page. If you prefer to insert it into the Header of your page, you can use the approach that we use to insert the CSS Block
:

// load CSS and move it into the Header
src = Environment.NewLine + CSSBlock.Text;
this.Page.Header.Controls.Add( new LiteralControl(src));

Same procedure here: Load the Css Code from the Literal Control, edit it to your heart’s content and then wrap it into a new LiteralControl to add it to the Page.Header Controls collection.


Using this technique you can easily write self contained User Controls with enclosed Scripts and Styles that embed themselves perfectly into the parent page, and as a bonus your get both CSS and JavaScript Intellisense for external files in your User Control …


Checkbutton and Radiobuttons revisited: a jQuery plug-in.

Donnerstag, 25 März 2010 00:45 von Tom Gröger


Well some time ago I posted the code for a jquery plugin to Radiobutton-Groups. As usual, soon after I had finished my code I came across a problem where I had to manage a large group of check buttons. Not a big deal though, after all check buttons are much like radio buttons, except that the later normally should return a value indicating which of the buttons in the group has been selected ( and while there is only one radio button possibly selected at a time, this makes perfect sense ). 

Check buttons in comparison are mostly used to return a bit value – checked or not checked. Before Ajax a check button value was necessary because the only way a checkbox could tell the Server whether it was checked or not was to set its value into the Request.Form collection, but fortunately times are a-changing: Now all we need to know is it’s checked state. Also, check buttons can be grouped together to a logical unit, but it doesn’t make sense for such a group to return a single value as with radio groups - this differences had to be handled in order to create a plug in that would manage both radio- and check button groups.


The outcome was a JQuery plugin, or better two plug ins:
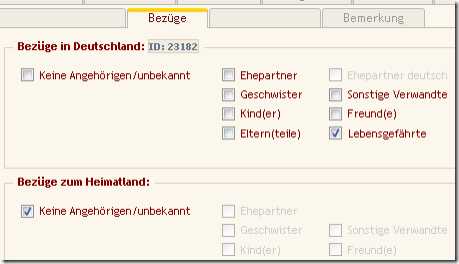


 btngroup

$.fn.Checkbox wraps a check- or radio button Input and its associated text label. The jQuery wrapper is extended with a disable- and enable method that will not only enable/disable the button but also the label – as you can see in the screenshot from one of my apps. 
If the wrapped control is a check button then the native jQuery val()  method is overwritten to set/get true/false values both reflecting and setting the checked state.


Let’s play a typical scenario for a checkbox like this:

<label for="chk">Thirsty ?</label><input type="checkbox" id="chk" />


Assume that you want to uncheck the button, disable it, and change the text of the Label:

with the Checkbox plugin this is a one-liner:

// Create a Checkbox object

var jCheck= $("#chk").Checkbox();

jCheck.uncheck().disable().label.text("Drunk!");


// Read the state of our Checkbox

var IsFilled = jCheck.checked();


// You can also use the val() method to set/get the checked state

var IsFilled = jCheck.val();


// Set the checked state of our Checkbox

jCheck.checked( bIsSober );


Same applies to a Radio Button,  although a single Radio Buttons doesn’t make a lot of sense.
If you want to work with Grouped check- or radio buttons then we use the second plugin:


$.fn.ButtonGroup extends a jQuery container object ( usually a table or fieldset ) that wraps a couple of radio- or checkbox buttons together with their associated labels.  The ButtonGroup then allows you to easily set/get a Radio group's value,  disable- or enable the complete Group (including labels) or only selected buttons. Internally the ButtonGroup is no more than a list of $.fn.Checkbox objects that wrap the check or radio buttons and some code to bring it all together. The modified get() method returns such an extended button object that also  'understands' checked/enable/disable messages.

By default the control expects and returns integer values. If no button is selected at all then

ButtonGroup.val() will return a Zero ( or –1, if Zero is a valid value for one of the Buttons) . These values can be overwritten by an options object passed as a constructor parameter as usual for many jQuery plugins.


Lets create a little button group:

<table id="tbGroup">
    <tr>
        <td><input type="radio" id="rad0" name="radCity" value="1" /></td>
        <td><label for="rad0">German citizen by birth</label></td>
    </tr>                
    <tr>
        <td><input type="radio" id="rad1" name="radCity" value="2" /></td>
        <td><label for="rad1">Acquired German citizenship:</label></td>
    </tr>                
    <tr>
        <td><input type="radio" id="rad2" name="radCity" value="3" /></td>
        <td><label for="rad2">Not a German citizen</label></td>
    </tr>                
</table>

Nothing unusual so far, three Radio buttons ( could be Check buttons as well ) grouped together with a common name property “radCity”.  In this case we use a Table to give our buttons a container ( and proper layout ), but you can also use a div-tag or whatever tags you prefer – this container will  the prime candidate for our ButtonGroup:


Using the ButtonGroup Control:

// Create the Radio ButtonGroup var jGroup = $("#tbGroup").ButtonGroup();


jGroup.disable(0); // Disable the first Button

jGroup.disable(0,2); // Disable Buttons 0 and 2

jGroup.val("1"); // Set a value and so select button 0


var IDRadio = jGroup.val().toInt(); // read the radio group value .


jGroup.get(0); // returns first button object

jGroup.get(1,2); // returns Array with button 1 and 2

jGroup.get("checked"); // returns selected Radio Button


// Disable all buttons, remove selection, enable one button and select it

if ($Controls.chkNoRelatives.checked()) {
    $Controls.tbGroup.disable().uncheck().get("rad1").enable().checked(true);
};


This short example might give you an impression about the power and simplicity of this plugin, imagine you’d have to code the last example by hand ! Please visit the ButtonGroup Live Demo Page  for a short demonstration of Radio- and Checkbox Groups.  Comments and Improvements appreciated !


Resources:


A jQuery-Room for RadioGroups

Mittwoch, 30 Dezember 2009 16:14 von Tom Gröger

Please note: This Code has been revised and replaced by the ButtonGroup plugin!

So one day I had enough of reading about the oh-so great jQuery Library and decided to give it a try. After all what could be so exciting about a JavaScript library ? Just a couple of methods to select a Dom element? Man, was I wrong - learning jQuery completely changed my way of programming.

More than a year later now I have moved most of my UI code into my JavaScript Framework, using jQuery as my Control-container and Ajax engine ( and for all the other neat stuff that it does ). One thing I always stumbled upon was the use of Radio buttons; like Check buttons they can be checked or not, but unlike them they can be combined to a Radio group that returns a value. My first shot was to wrap the Radio group into a jQuery object and then work on it:

<div id="container">
<input type="radio" id="rad1" name="radKult" value="1" />
<label for="rad1">free drinks</label>
<input type="radio" id="rad2" name="radKult" value="2" />
<label for="rad1">paid drinks</label>
</div>
// Create RadioGroup wrapper and set/get value
jGroup = $("#container input:radio");
var sel = jGroup.filter(':checked').val()
jGroup.attr("checked", "checked");


Ok, that worked somehow, but honestly it was a pain in the rear and most of the time I found myself working with the Dom elements again. The other problem I had with this approach was that while I could easily enable or disable the Radio buttons, but not the attached Labels.

So, finally I came across this problem once too many and sat down to write a jQuery plug-in:


The RadioGroup Control:


The Control should be an extended jQuery object with some methods added and others overwritten. The jQuery part would only wrap the radio buttons,  and the inner class keeps its own a list of radio button objects and associated labels.

  • The val() method is overwritten to easily return and set the Radio group's value
  • The enable() and disable() methods should enable and disable either the complete group (including labels) or only selected buttons
  • The modified get() method will return an extended Radio button object that also understands checked/enable/disable messages


The Code itself is simple and straightforward, inside my controls I do prefer to use the DOM methods ( for performance reasons ) whenever possible:


   ////////////////////// RadioGroup //////////////////////////
    

$.fn.RadioGroup = function() {
/// <summary>
/// JQuery plugin that creates a TomSoft.Form.RadioGroup object and
/// attaches this to the Wrapper of the RadioGroup-Container.
/// <returns type="jQuery" />

if (this.length != 1) {
throw new Error("bad selector for RadioGroup " + this.selector,
"window.document");
return this;
}

var items = [];
_init(this);

//
// JQuery object extensions
//
this.val = function(value) {
/// <summary>
/// Returns the value of the checked radio button within the Group
/// or checks the radiobutton with the given value. if the value
/// does not exist then the radiogroup remains unchecked
/// </summary>

if (arguments.length) {
value = value.toString(); // setter
for (var i = 0; i < items.length; ++i) {
var j = items[i];
j.checked(false);
if (value == j.val()) {
j.checked(true);
break;
};
};
return this;
}
// getter
var j = this.selected();
return ((j) ? j.val() : -1);
};

this.enable = function(bEnable) {
/// <summary>
/// enable/disable RadioGroup and associated Labels
/// </summary>
bEnable = (typeof (bEnable) == 'boolean') ? bEnable : true;
for (var i = 0; i < items.length; ++i) {
items[i].enable(bEnable);
}
return this;
};

this.disable = function() {
/// <summary>
/// if called without arguments the method disables all RadioButton
/// and associated Labels. If numeric arguments are passed then
/// all RadioButtons of the group are enabled except those with
/// matching the index position.
/// </summary>
/// <example>
/// $Controls.radioGroupHerkunft.disable(1,4,5);
/// </example>
if (arguments.length) {
for (var i = 0; i < items.length; ++i) {
// check if pos i is in the argument list to be disabled
var bEnable = ($.inArray(i, arguments) == -1);
items[i].enable(bEnable);
};
return this;
};
return this.enable(false);
};

this.selected = function() {
/// <summary>
/// Returns the checked radiobutton within the Group
/// </summary>
for (var i = 0; i < items.length; ++i) {
if (items[i].checked()) {
return items[i];
};
};
return null;
};

this.get = function(index) {
/// <summary>
/// Returns modified RadioButton Object by position or ID(s):
///
/// radio.get( 0 ) returns first jRadioLabel
/// radio.get( 0,2,3 ) returns Array of buttons in Pos 0,2 and 3
/// usage: $.each( radio.get(0,..),
/// function(){this.disable()})
/// radio.get("checked") return selected jRadioLabel
/// radio.get("all") return list array of all Radio Buttons
/// </summary>

var list = [];

for (var cx = 0; cx < arguments.length; ++cx) {
var arg = arguments[cx];
if (typeof (arg) == 'string') {
if (arg == "checked") return this.selected();
if (arg == "all") return items;

for (var i = 0; i < items.length; ++i) {
if (items[i].radio.id == arg)
list.push(items[i]);
};
}
else if (arg >= 0 && arg < items.length) {
list.push(items[arg]);
};
};
if (list.length)
return (list.length == 1) ? list[0] : list;

return;
};

return this;


//
// Initialize the object
//
function _init(jObj) {

var jLabel = $("label", jObj);
var jRadio = $(":radio", jObj);
for (var i = 0; i < jRadio.size(); ++i) {
items.push(_jRadioLabel(jRadio.get(i), jLabel.get(i)));
};
};

//
// Creates a modified jQuery Object-Wrapper for the given Radio/Label pair
// The jQuery radio Object has some added methods and properties:
// .radio: returns the dom-RadioButton Object
// .label returns the jQuery-Label Object
// .checked: gets/sets the checked state of the RadioButton
//
function _jRadioLabel(radio, label) {

var jRadio = $(radio);

jRadio.radio = radio;
jRadio.label = $(label);

if (jRadio.label.size() == 1)
label.htmlFor = radio.id;

jRadio.checked = function(bChecked) {
/// <summary>
/// gets or sets the checkded state of the RadioButton
/// </summary>
/// <returns type="boolean">checked state</returns>
if (arguments.length) {
bChecked = (typeof (bChecked) == 'boolean') ? bChecked : true;
radio.checked = bChecked; // setter
return jRadio;
};
return radio.checked; // getter
};

jRadio.enable = function(bEnable) {
/// <summary>
/// enable/disable RadioButton and associated Label
/// </summary>
bEnable = (typeof (bEnable) == 'boolean') ? bEnable : true;
radio.disabled = !bEnable;
jRadio.label.css("color", bEnable ? "" : "#ccc")
if (!bEnable) radio.checked = false;
return jRadio;
};

jRadio.disable = function() {
/// <summary>
/// diables RadioButton and associated Label
/// </summary>
return jRadio.enable(false);
};

return jRadio;
};
};


Using the RadioGroup Control:


The usage should be intuitive and easy, yet give you access to every single element of the Radio Group:
jGroup=$("#container").RadioGroup();  // Create extended RadioGroup Object
jGroup.disable(0);                    // disable the first button
jGroup.disable(0,3,4);                // disable a list of radio buttons
jGroup.val("1"); // Set a value and so select a button db.IDRadio = jGroup.val().toInt(); // read the radio group into a field ..
jGroup.get(0); // returns first button as jQuery object jGroup.get(1,2); // returns Array of two jQuery radio buttons jGroup.get("checked"); // return selected jQuery radio button
var domRadio = jGroup.get(0).radio; // access the radio Dom object var domLabel = jGroup.get(0).label; // access the label Dom object


Resources: